2: THE HOUSING
The housing is the waterproof case within which the camera is kept while shooting underwater. When looking for a housing, look for the following 3 main attributes:
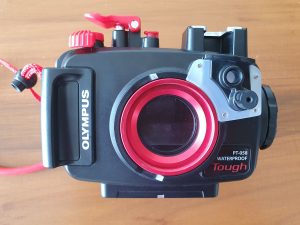
Housings can be made by the OEM (camera manufacturer) or by a third-party manufacturer like Nauticam, Fantasea, Seafrog, etc.OEM housings are generally relatively inexpensive and made of polycarbonate. Third-party housings often tend to be a bit more expensive, and often made of metal.
Often (but not always), third-party housings may have a better ecosystem of accessories – which is a good reason to pay a premium for them. In addition, while OEM housings are typically rated to 30m or 40m, metal third-party housings may be rated to 60m or deeper – for divers looking to shoot at tech depths, a more expensive 3rd party housing may often be the only solution.
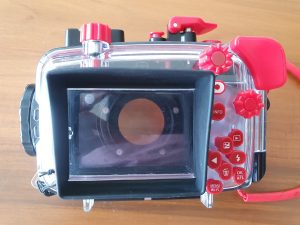
However, purely in terms of reliability and functionality, I have not found 3rd party housings to be more reliable or less prone to flooding. Personally, as long as the housing met my preferred depth rating and checked off the three attributes listed above, I would happily buy the cheapest housing – as long as it was from a reputable brand. There are plenty of horror stories about ultra-cheap housings flooding due to poor QC – that is not a risk I am willing to take, so save $100-200.
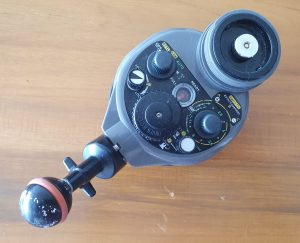
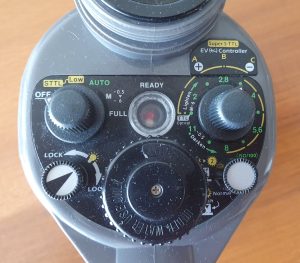
3: THE STROBE (UNDERWATER FLASH)
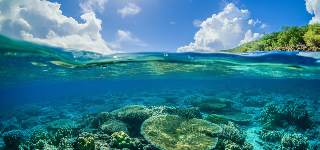
Photography is, in its essence, the act of recording light. It doesn’t matter how expensive your camera – if the light is poor, the image will be poor. And underwater, the natural light is always poor: you will need a powerful flash to not just brighten the scene but also to add in the reds that have been absorbed by the water.
Simply put, the strobe is the single most important element in taking high-quality images.Period.This is one area where you should not skimp (and unfortunately, this is the one area where most people do try to cut corners). A good strobe has the following attributes:
One thing worth noting- manufacturers often tend to be very optimistic with their claims about power and angle of coverage. And unfortunately, in the case of really inexpensive products sold on Ali Express and elsewhere, they flat out lie – and I say this as someone who uses dive lights and bicycle lights that I have bought (and will continue to buy) on those sites.
Also, video lights are not a substitute for strobes. Video lights put out a lot less power than strobes – even a $1500 video light will not have as much power as a $500 strobe. So while they may work for macro and close-up work, they are not as good for wide-angle photography.
Given the importance of the lighting to underwater photography (I really think your strobes are the centrepiece of your system), I cannot overstate the importance of allocating ample budget towards them. Typically, most people skimp out and get budget strobes. Then, after a few dive trips, they end up upgrading. It is better to just get it right the first time – and also more economical in the long run.
It is one thing to buy inexpensive torch lights or video lights (which are really torch lights with a wide angle of view); however, the moment you add in sync circuitry and greater power needed for strobes, cheap becomes a losing proposition. I recommend Inon and Sea&Sea as 2 brands offering very good power, reliability & features for the money.
Also, as your photography skills improve, you may want to add a second strobe. But for now, it is better to start with 1 good strobe.
4: THE SYNC CABLE
This is a piece of fibre optic cable that connects your camera to the strobe – when your camera’s flash fires, that triggers your external strobe. Depending on what mode you are using, the strobe will either then put out a specific amount of light (manual mode) or will also shut off when the camera’s strobe shuts off (auto / TTL mode).
The main thing to look for is a cable whose terminators are compatible with your system. The standard used is a push fit (also known as the Sea & Sea connector, after the popular strobe maker). Inon strobes use a screw-in terminator, which is not very popular outside of Inon products, but is less prone to popping out (which isn’t really a big deal, though).

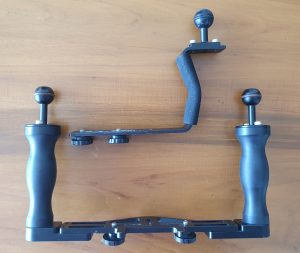
5: THE CONNECTING HARDWARE
The camera, housing, strobe and cable are the essential bits needed to take the photo. But you also need a bunch of accessories to physically combine them into one unit, and also to position your strobe underwater when shooting. These are the following:
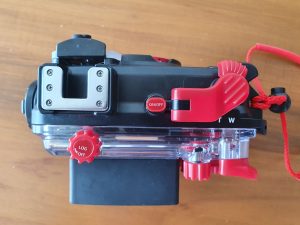
a. The base tray/handles:
The base tray is a plate that connects via a screw to the tripod mount at the bottom of most housings. It will have 1 or 2 handles on the side (depending on the option you get), for mounting most accessories.
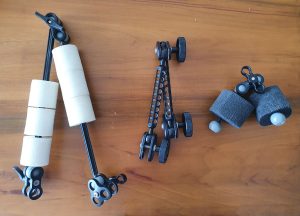
The standard for connecting multiple pieces of hardware is a 1” ball mount, as shown in the photo below. There are other connecting mechanisms as well, but try to get this, as this gives you the most options for putting together different hardware elements.
b. Strobe arms:
Strobes are typically mounted on strobe arms to get them further away from the central axis of the camera/lens (this reduces backscatter).
A common option is flex arms – they are easy to use and do not require a lot of other hardware. The downside is that they are limited in length and also in positional flexibility.
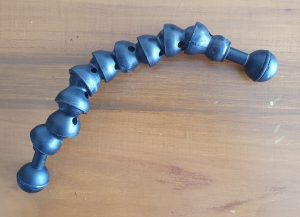
In my opinion, rigid strobe arms are a better option for enthusiasts – by using 2 of these arms to connect each strobe, you have maximum positional flexibility for lighting (and remember – underwater photography is all about lighting). Strobe arms come in various lengths – for someone starting out with underwater photography, two 6” arms per strobe is a good starting point and well suited for everything from macro to wide angle.
As with the tray/handles, make sure you get arms with 1” ball terminators on each end.
c. Butterfly Clamps
These are clamps for connecting 2 separate hardware components, each of which has a 1” ball terminator.
For each strobe, you will need 3 of those – one to connect the handle to Arm 1, a second to connect Arm 1 to Arm 2 and a third to attach the strobe to Arm 2.

The good news is that here, you can DEFINITELY save money by buying inexpensive arms and clamps off eBay, Ali Express or wherever. These are simple pieces of machined metal and do not require high technology or high QC, and the generic hardware costs a fraction of what the branded ones do.
So once you have a camera, housing and strobe, all neatly mounted on a tray and strobe arms, you are ready to go shooting. And indeed, you have all the tools you need to take excellent photographs – in fact, as long as you can get close to the subject and light it properly, the images from a compact camera will not be too different from those taken with an ILC.
However, where the compact camera typically falls short of an ILC is in its ability to get really close (near lifesize or 1:1 reproduction) of really small objects, or its ability to encompass sweeping wide views of reefs or really large animals like whale sharks, etc.
The former requires really good macro capabilities (which most compact cameras lack – the Olympus TG series being an exception). The latter requires an ultra-wide-angle of view, which is also not possible with compact cameras.
However, there are ways to get around this – by using adapter lenses. You can get close-up adapters, which let you get closer to a subject (and thereby increase magnification). You can also get wide-angle adapters, which widen the field of view of the camera, thereby letting you get closer to large subjects or wide vistas. These are typically called wet lenses, as you can attach and remove them underwater. There is a small optical tradeoff compared to the specialised gear that ILCs use, but you make up for it by being able to shoot both wide-angle and macro on the same dive.
6: ADD-ON ACCESSORIES

Ability to use wet lenses depends primarily on being able to attach them to the front of your housing – typically, this can be done via a proprietary bayonet mount (specific to individual 3rd party manufacturers) or via a standard threaded screw mount (58mm or 67mm are typical sizes). I am a big fan of screw mounts, as it lets you add components from a wide variety of manufacturers.
If you are starting out, you do not need to spend money on these – but do make sure your housing has an option to add these later.
Summary
If you were looking for a magical solution to putting together a system for underwater photography on the cheap, I am sorry to disappoint. Versatile, cheap, quality – you can only pick two, unfortunately. I have chosen to focus (no pun intended) on putting together something that is significantly better than what you can shoot with a GoPro.
The system I have suggested is going to cost somewhere in the following ballpark:
– Camera: Rs 30,000
– Housing: Rs 25,000
– Strobe: Rs 35,000
– Sync cable: Rs 5,000
– Tray: Rs 2,500
– Arms + connectors: Rs 6,000
So about Rs 1 lakh / $1300 or so for the whole thing, give or take 10-15%.
Is it cheap? No. But I also think that there is no point spending $400-500 / Rs 30,000-40,000 and getting something that is only a little better – you might as well just stay with what you have. If you are going to upgrade, you might as well upgrade to something that is truly and noticeably better.
Also, it is better to spend a little more to buy the Right Stuff, as opposed to buying something cheaper, which is a compromise, which you have to upgrade later. Almost every photographer goes through a stage like this (eg, with tripods) – and virtually every experienced photographer later advises against it.
If you are on a budget, consider buying used/NOS. The previous generation camera and the previous generation housing can be had for substantial discounts and with relatively negligible differences in performance. Used strobes can also be a good deal, but a bit harder to source in India.
In the grand scheme of things, look at it from the lifetime utility point of view. Given how much a diving trip costs, the small increment you pay for better quality pales into insignificance, especially when you amortise it over the number of years of use you will get from it.
Anyway, I hope you found this article useful – do give us a follow on Facebook and Instagram, and perhaps share this link if you did.
2: THE HOUSING
The housing is the waterproof case within which the camera is kept while shooting underwater. When looking for a housing, look for the following 3 main attributes:
Housings can be made by the OEM (camera manufacturer) or by a third-party manufacturer like Nauticam, Fantasea, Seafrog, etc.OEM housings are generally relatively inexpensive and made of polycarbonate. Third-party housings often tend to be a bit more expensive, and often made of metal.
Often (but not always), third-party housings may have a better ecosystem of accessories – which is a good reason to pay a premium for them. In addition, while OEM housings are typically rated to 30m or 40m, metal third-party housings may be rated to 60m or deeper – for divers looking to shoot at tech depths, a more expensive 3rd party housing may often be the only solution.
However, purely in terms of reliability and functionality, I have not found 3rd party housings to be more reliable or less prone to flooding. Personally, as long as the housing met my preferred depth rating and checked off the three attributes listed above, I would happily buy the cheapest housing – as long as it was from a reputable brand. There are plenty of horror stories about ultra-cheap housings flooding due to poor QC – that is not a risk I am willing to take, so save $100-200.
3: THE STROBE (UNDERWATER FLASH)
Photography is, in its essence, the act of recording light. It doesn’t matter how expensive your camera – if the light is poor, the image will be poor. And underwater, the natural light is always poor: you will need a powerful flash to not just brighten the scene but also to add in the reds that have been absorbed by the water.
Simply put, the strobe is the single most important element in taking high-quality images.Period.This is one area where you should not skimp (and unfortunately, this is the one area where most people do try to cut corners). A good strobe has the following attributes:
One thing worth noting- manufacturers often tend to be very optimistic with their claims about power and angle of coverage. And unfortunately, in the case of really inexpensive products sold on Ali Express and elsewhere, they flat out lie – and I say this as someone who uses dive lights and bicycle lights that I have bought (and will continue to buy) on those sites.
Also, video lights are not a substitute for strobes. Video lights put out a lot less power than strobes – even a $1500 video light will not have as much power as a $500 strobe. So while they may work for macro and close-up work, they are not as good for wide-angle photography.
Given the importance of the lighting to underwater photography (I really think your strobes are the centrepiece of your system), I cannot overstate the importance of allocating ample budget towards them. Typically, most people skimp out and get budget strobes. Then, after a few dive trips, they end up upgrading. It is better to just get it right the first time – and also more economical in the long run.
It is one thing to buy inexpensive torch lights or video lights (which are really torch lights with a wide angle of view); however, the moment you add in sync circuitry and greater power needed for strobes, cheap becomes a losing proposition. I recommend Inon and Sea&Sea as 2 brands offering very good power, reliability & features for the money.
Also, as your photography skills improve, you may want to add a second strobe. But for now, it is better to start with 1 good strobe.
4: THE SYNC CABLE
This is a piece of fibre optic cable that connects your camera to the strobe – when your camera’s flash fires, that triggers your external strobe. Depending on what mode you are using, the strobe will either then put out a specific amount of light (manual mode) or will also shut off when the camera’s strobe shuts off (auto / TTL mode).
The main thing to look for is a cable whose terminators are compatible with your system. The standard used is a push fit (also known as the Sea & Sea connector, after the popular strobe maker). Inon strobes use a screw-in terminator, which is not very popular outside of Inon products, but is less prone to popping out (which isn’t really a big deal, though).
5: THE CONNECTING HARDWARE
The camera, housing, strobe and cable are the essential bits needed to take the photo. But you also need a bunch of accessories to physically combine them into one unit, and also to position your strobe underwater when shooting. These are the following:
a. The base tray/handles:
The base tray is a plate that connects via a screw to the tripod mount at the bottom of most housings. It will have 1 or 2 handles on the side (depending on the option you get), for mounting most accessories.
The standard for connecting multiple pieces of hardware is a 1” ball mount, as shown in the photo below. There are other connecting mechanisms as well, but try to get this, as this gives you the most options for putting together different hardware elements.
b. Strobe arms:
Strobes are typically mounted on strobe arms to get them further away from the central axis of the camera/lens (this reduces backscatter).
A common option is flex arms – they are easy to use and do not require a lot of other hardware. The downside is that they are limited in length and also in positional flexibility.
In my opinion, rigid strobe arms are a better option for enthusiasts – by using 2 of these arms to connect each strobe, you have maximum positional flexibility for lighting (and remember – underwater photography is all about lighting). Strobe arms come in various lengths – for someone starting out with underwater photography, two 6” arms per strobe is a good starting point and well suited for everything from macro to wide angle.
As with the tray/handles, make sure you get arms with 1” ball terminators on each end.
c. Butterfly Clamps
These are clamps for connecting 2 separate hardware components, each of which has a 1” ball terminator.
For each strobe, you will need 3 of those – one to connect the handle to Arm 1, a second to connect Arm 1 to Arm 2 and a third to attach the strobe to Arm 2.
The good news is that here, you can DEFINITELY save money by buying inexpensive arms and clamps off eBay, Ali Express or wherever. These are simple pieces of machined metal and do not require high technology or high QC, and the generic hardware costs a fraction of what the branded ones do.
So once you have a camera, housing and strobe, all neatly mounted on a tray and strobe arms, you are ready to go shooting. And indeed, you have all the tools you need to take excellent photographs – in fact, as long as you can get close to the subject and light it properly, the images from a compact camera will not be too different from those taken with an ILC.
However, where the compact camera typically falls short of an ILC is in its ability to get really close (near lifesize or 1:1 reproduction) of really small objects, or its ability to encompass sweeping wide views of reefs or really large animals like whale sharks, etc.
The former requires really good macro capabilities (which most compact cameras lack – the Olympus TG series being an exception). The latter requires an ultra-wide-angle of view, which is also not possible with compact cameras.
However, there are ways to get around this – by using adapter lenses. You can get close-up adapters, which let you get closer to a subject (and thereby increase magnification). You can also get wide-angle adapters, which widen the field of view of the camera, thereby letting you get closer to large subjects or wide vistas. These are typically called wet lenses, as you can attach and remove them underwater. There is a small optical tradeoff compared to the specialised gear that ILCs use, but you make up for it by being able to shoot both wide-angle and macro on the same dive.
6: ADD-ON ACCESSORIES
Ability to use wet lenses depends primarily on being able to attach them to the front of your housing – typically, this can be done via a proprietary bayonet mount (specific to individual 3rd party manufacturers) or via a standard threaded screw mount (58mm or 67mm are typical sizes). I am a big fan of screw mounts, as it lets you add components from a wide variety of manufacturers.
If you are starting out, you do not need to spend money on these – but do make sure your housing has an option to add these later.
Summary
If you were looking for a magical solution to putting together a system for underwater photography on the cheap, I am sorry to disappoint. Versatile, cheap, quality – you can only pick two, unfortunately. I have chosen to focus (no pun intended) on putting together something that is significantly better than what you can shoot with a GoPro.
The system I have suggested is going to cost somewhere in the following ballpark:
– Camera: Rs 30,000
– Housing: Rs 25,000
– Strobe: Rs 35,000
– Sync cable: Rs 5,000
– Tray: Rs 2,500
– Arms + connectors: Rs 6,000
So about Rs 1 lakh / $1300 or so for the whole thing, give or take 10-15%.
Is it cheap? No. But I also think that there is no point spending $400-500 / Rs 30,000-40,000 and getting something that is only a little better – you might as well just stay with what you have. If you are going to upgrade, you might as well upgrade to something that is truly and noticeably better.
Also, it is better to spend a little more to buy the Right Stuff, as opposed to buying something cheaper, which is a compromise, which you have to upgrade later. Almost every photographer goes through a stage like this (eg, with tripods) – and virtually every experienced photographer later advises against it.
If you are on a budget, consider buying used/NOS. The previous generation camera and the previous generation housing can be had for substantial discounts and with relatively negligible differences in performance. Used strobes can also be a good deal, but a bit harder to source in India.
In the grand scheme of things, look at it from the lifetime utility point of view. Given how much a diving trip costs, the small increment you pay for better quality pales into insignificance, especially when you amortise it over the number of years of use you will get from it.
Anyway, I hope you found this article useful – do give us a follow on Facebook and Instagram, and perhaps share this link if you did.